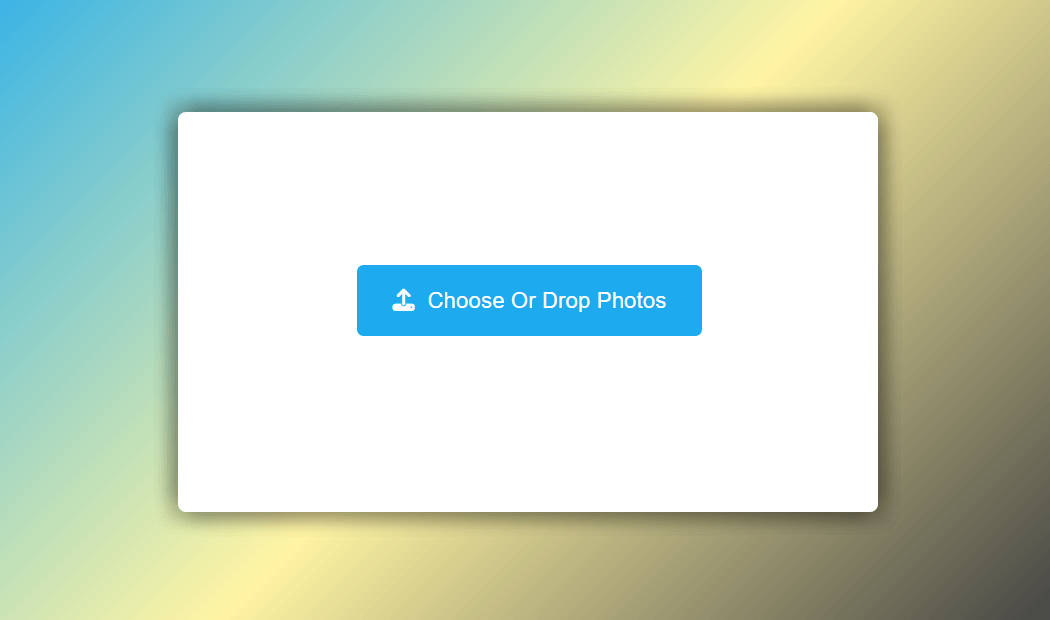
How to make Drag & Drop File Uploader
with HTML,CSS and JavaScript
How do I drag and drop a file to upload?
How do I drag and drop the file and folder in computer? By using the right mouse button. You can navigate your file, document or a folder and hold the right mouse button, then drag the mouse to a specific location, then release the right mouse button.
How to implement drag and drop file upload in JavaScript?
The dragged item is dragged over dropArea, making it the target for the drop event if the user drops it there. The dragged item is dragged off of dropArea and onto another element, making it the target for the drop event instead. Every few hundred milliseconds, while the dragged item is over dropArea and is moving.
Video Tutorial of Drag & Drop File Uploader
Drag & Drop File Uploader [Source Codes]
To Create Drag & Drop File Uploader follow the given steps line by line:
Create a folder. You can name this folder whatever you want, and inside this folder, create the mentioned files.
Create an index.html file. The file name must be index and its extension .html
Create a style.css file. The file name must be style and its extension .css
Create a script.js file. The file name must be style and its extension .js
Once you create these files, paste the given codes into the specified files. If you don’t want to do these then scroll down and download the source code.
First, paste the following codes into your index.html file
- <!DOCTYPE html>
- <html lang="en">
- <head>
- <meta name="viewport" content="width=device-width, initial-scale=1.0">
- <title>Drag & Drop File Upload</title>
- <link
- rel="stylesheet" href="https://cdnjs.cloudflare.com/ajax/libs/font-awesome/6.2.0/css/all.min.css">
- <link rel="stylesheet" href="style.css">
- </head>
- <body>
- <div class="container">
- <input type="file" id="upload-button" multiple accept="image/*">
- <label for="upload-button"
- ><i class="fa-solid fa-upload"></i> Choose Or Drop Photos
- </label>
- <div id="error"></div>
- <div id="image-display"></div>
- </div>
- <script src="script.js"></script>
- </body>
- </html>
-
Now paste the following codes into your style.css file
- * {
- padding: 0;
- margin: 0;
- box-sizing: border-box;
- font-family: Arial, sans-serif;
- }
- body {
- height: 100vh;
- background: linear-gradient(135deg,#1DAAEF,#FFF4A3, #282A35);
- }
- .container {
- background-color: #FFFFFF;
- width: 700px;
- height: 400px;
- position: absolute;
- transform: translateX(-50%);
- left: 50%;
- top: 7em;
- box-shadow:
- 10px 10px 15px rgba(0, 0, 0, 0.1),
- -10px -10px 15px rgba(0, 0, 0, 0.1),
- -10px 10px 15px rgba(0, 0, 0, 0.1),
- 10px -10px 15px rgba(0, 0, 0, 0.1),
- 10px 10px 15px rgba(0, 0, 0, 0.1),
- -10px -10px 15px rgba(0, 0, 0, 0.1),
- -10px 10px 15px rgba(0, 0, 0, 0.1),
- 10px -10px 15px rgba(0, 0, 0, 0.1);
- border-radius: 0.5em;
- display: flex;
- justify-content: center;
- align-items: center;
- }
-
- input[type="file"] {
- display: none;
- }
-
- label {
- position: relative;
- background-color: #1DAAEF;
- color: #ffffff;
- font-size: 1.4em;
- text-align: center;
- width: 55em;
- padding: 1em 0;
- border-radius: 0.3em;
- margin: 0 auto 1em 8em;
- cursor: pointer;
- }
-
- #image-display {
- position: relative;
- width: 90%;
- margin: 0 auto;
- display: flex;
- justify-content: space-evenly;
- gap: 1.25em;
- flex-wrap: wrap;
- }
- #image-display figure {
- width: 45%;
- }
- #image-display img {
- width: 100%;
- }
- #image-display figcaption {
- font-size: 0.8em;
- text-align: center;
- color: #5a5861;
- }
- .active {
- border: 0.2em dashed #025bee;
- }
- #error {
- text-align: center;
- color: #ff3030;
- }
-
Now paste the following codes into your script.js file
- let uploadButton = document.getElementById("upload-button");
- let chosenImage = document.getElementById("chosen-image");
- let fileName = document.getElementById("file-name");
- let container = document.querySelector(".container");
- let error = document.getElementById("error");
- let imageDisplay = document.getElementById("image-display");
-
- const fileHandler = (file, name, type) => {
- if (type.split("/")[0] !== "image") {
-
- error.innerText = "Please upload an image file";
- return false;
- }
- error.innerText = "";
- let reader = new FileReader();
- reader.readAsDataURL(file);
- reader.onloadend = () => {
-
- let imageContainer = document.createElement("figure");
- let img = document.createElement("img");
- img.src = reader.result;
- imageContainer.appendChild(img);
- imageContainer.innerHTML += `<figcaption>${name}</figcaption>`;
- imageDisplay.appendChild(imageContainer);
- };
- };
- uploadButton.addEventListener("change", () => {
- imageDisplay.innerHTML = "";
- Array.from(uploadButton.files).forEach((file) => {
- fileHandler(file, file.name, file.type);
- });
- });
-
- container.addEventListener(
- "dragenter",
- (e) => {
- e.preventDefault();
- e.stopPropagation();
- container.classList.add("active");
- },
- false
- );
-
- container.addEventListener(
- "dragleave",
- (e) => {
- e.preventDefault();
- e.stopPropagation();
- container.classList.remove("active");
- },
- false
- );
-
- container.addEventListener(
- "dragover",
- (e) => {
- e.preventDefault();
- e.stopPropagation();
- container.classList.add("active");
- },
- false
- );
-
- container.addEventListener(
- "drop",
- (e) => {
- e.preventDefault();
- e.stopPropagation();
- container.classList.remove("active");
- let draggedData = e.dataTransfer;
- let files = draggedData.files;
- imageDisplay.innerHTML = "";
- Array.from(files).forEach((file) => {
- fileHandler(file, file.name, file.type);
- });
- },
- false
- );
-
- window.onload = () => {
- error.innerText = "";
- };
-
If you face any difficulties while creating your Drag & Drop File Uploader or your code is not working as expected, you can download the source code files by clicking on the download button.
Related post
 Traditional German Food: A Guide to 10 Delicious Dishe
onlinefindout
 Black Forest Cake Recipe: A Step-by-Step Guide
onlinefindout
Black Forest Cake Recipe: A Step-by-Step Guide