Create Pagination with HTML,CSS
and JavaScript
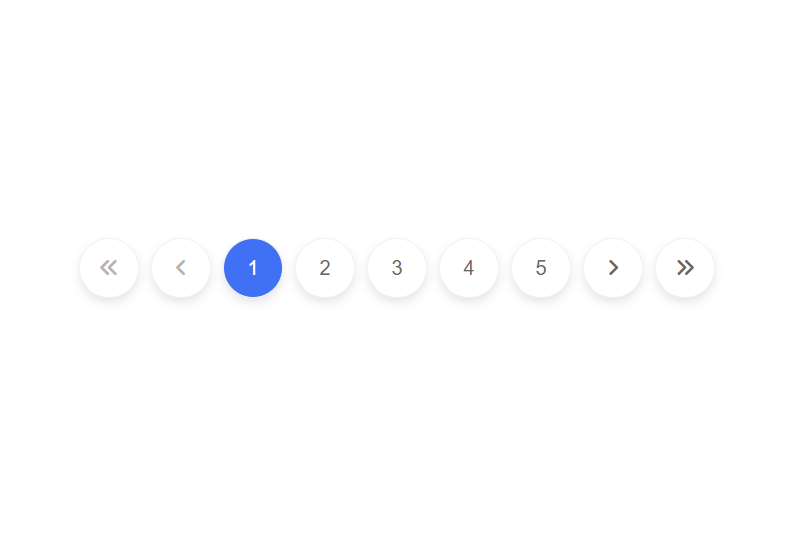
You might have seen toward the finish of the site that there is a pagination segment that is utilized to leap to the following website page of the site. Did you realize we can make that pagination utilizing HTML CSS and JavaScript? Today in this blog, you will figure out how to make pagination utilizing HTML CSS, and JavaScript. Notwithstanding the pagination, there will be button approval and activitys included also.
Create Pagination with HTML,CSS and JavaScript | Video Tutorial
Pagination with HTML,CSS and JavaScript[Source Codes]
To Create Pagination with HTML,CSS and JavaScript follow the given steps line by line:
Create a folder. You can name this folder whatever you want, and inside this folder, create the mentioned files.
Create an index.html file. The file name must be index and its extension .html
Create a style.css file. The file name must be style and its extension .css
Create a script.js file. The file name must be style and its extension .js
Once you create these files, paste the given codes into the specified files. If you don’t want to do these then download the source code.
First, paste the following codes into your index.html file
- <!DOCTYPE html>
- <html lang="en">
- <head>
- <meta charset="UTF-8">
- <meta name="viewport" content="width=device-width, initial-scale=1.0">
- <title>Pagination</title>
- <link rel="stylesheet" href="style.css">
- <link rel="stylesheet" href="https://cdnjs.cloudflare.com/ajax/libs/font-awesome/6.2.1/css/all.min.css">
- </head>
- <body>
- <div class="container">
- <button class="button" id="startBtn" disabled>
- <i class="fa-solid fa-angles-left"></i>
- </button>
- <button class="button prevNext" id="prev" disabled>
- <i class="fa-solid fa-angle-left"></i>
- </button>
-
- <div class="links">
- <a href="#" class="link active">1</a>
- <a href="#" class="link">2</a>
- <a href="#" class="link">3</a>
- <a href="#" class="link">4</a>
- <a href="#" class="link">5</a>
- </div>
-
- <button class="button prevNext" id="next">
- <i class="fa-solid fa-angle-right"></i>
- </button>
- <button class="button" id="endBtn">
- <i class="fa-solid fa-angles-right"></i>
- </button>
- </div>
-
- <script src="script.js"></script>
- </body>
- </html>
-
Now paste the following codes into your style.css file
- * {
- margin: 0;
- padding: 0;
- box-sizing: border-box;
- }
- body{
- margin: 0;
- font-family: Arial, sans-serif;
- height: 100vh;
- display: flex;
- justify-content: center;
- align-items: center;
- }
- body,
- .container,
- .button,
- .links,
- .link {
- display: flex;
- align-items: center;
- justify-content: center;
- }
- .container {
- column-gap: 12px;
- }
- .button {
- border: none;
- }
- .button i {
- pointer-events: none;
- }
- .button:disabled {
- color: #b3b3b3;
- pointer-events: none;
- }
- .button,
- .link {
- height: 60px;
- width: 60px;
- font-size: 20px;
- color: #666666;
- background-color: #fff;
- border: 1px solid #f2f2f2;
- border-radius: 50%;
- cursor: pointer;
- box-shadow: 0 5px 10px rgba(0, 0, 0, 0.1);
- }
- .links {
- column-gap: 12px;
- }
- .link {
- font-weight: 500;
- text-decoration: none;
- }
- .button:hover,
- .link:hover {
- color: #fff;
- background: #4070f4;
- }
- .link.active {
- color: #fff;
- background: #4070f4;
- }
-
Now paste the following codes into your script.js file
- // Selecting DOM elements
- const startBtn = document.querySelector("#startBtn"),
- endBtn = document.querySelector("#endBtn"),
- prevNext = document.querySelectorAll(".prevNext"),
- numbers = document.querySelectorAll(".link");
-
- // Setting an initial step
- let currentStep = 0;
-
- // Function to update the button states
- const updateBtn = () => {
- // If we are at the last step
- if (currentStep === 4) {
- endBtn.disabled = true;
- prevNext[1].disabled = true;
- } else if (currentStep === 0) {
- // If we are at the first step
- startBtn.disabled = true;
- prevNext[0].disabled = true;
- } else {
- endBtn.disabled = false;
- prevNext[1].disabled = false;
- startBtn.disabled = false;
- prevNext[0].disabled = false;
- }
- };
-
- // Add event listeners to the number links
- numbers.forEach((number, numIndex) => {
- number.addEventListener("click", (e) => {
- e.preventDefault();
- // Set the current step to the clicked number link
- currentStep = numIndex;
- document.querySelector(".active").classList.remove("active");
- // Add the "active" class to the clicked number link
- number.classList.add("active");
- updateBtn(); // Update the button states
- });
- });
-
- prevNext.forEach((button) => {
- button.addEventListener("click", (e) => {
-
- currentStep += e.target.id === "next" ? 1 : -1;
- numbers.forEach((number, numIndex) => {
- number.classList.toggle("active", numIndex === currentStep);
- updateBtn(); // Update the button states
- });
- });
- });
-
- // Add event listener to the "Start" button
- startBtn.addEventListener("click", () => {
-
- document.querySelector(".active").classList.remove("active");
-
- numbers[0].classList.add("active");
- currentStep = 0;
- updateBtn(); // Update the button states
- endBtn.disabled = false;
- prevNext[1].disabled = false;
- });
-
- endBtn.addEventListener("click", () => {
-
- document.querySelector(".active").classList.remove("active");
- // Add the "active" class to the last number link
- numbers[4].classList.add("active");
- currentStep = 4;
- updateBtn(); // Update the button states
- startBtn.disabled = false;
- prevNext[0].disabled = false;
- });
-
If you face any difficulties while creating Pagination with HTML,CSS and JavaScript or your code is not working as expected, you can download the source code files for this Pagination for free by clicking on the download button.
Related post
 Create Glassmorphism Sidebar with HTML CSS
onlinefindout
 Sidebar Menu with HTML
CSS & JavaScript
Sidebar Menu with HTML
CSS & JavaScript
onlinefindout
 Create a Image Editor with HTML CSS and JavaScript